

One of the great pleasures I get from the hobby is the chance to view everything through the hobbyists eyes. So when I am out shopping (ostensibly for real word stuff) I’ve always got half an eye on what I could use for the latest project on the tabletop. I’ve written before about my ongoing love of re-purposing toys for gaming and toy shops are a great place to start. However I never overlook what might be lurking in the local discount store, Poundland or craft supplies shop.
Although I have an airbrush I also make extensive use of spray cans to undercoat and basecoat miniatures and models. There is a lot to be said for the convenience, particularly of the Army Painter coloured sprays of quickly and effectively getting minis to the table. That said one of the areas that people often overlook are the basic colours used for undercoating (black, white and grey). Yes you could shell out a tenner (or more) on some Games Workshop or Army Painter sprays for this, but the basic car primers you can get from places like Halfords or even the pound shop are in most cases just as good or even better (just be careful to avoid the gloss versions). I’d highly recommend the matt black Halfords own brand cans, they give a really nice flat finish on most surfaces and are good value for the amount you get).
Anyway, I digress. On a recent lunchtime wander round my local Boyes store (one of the few places in the UK outside of specialist gaming shops that stock a good supply of Vallejo paints), I happened across these…

Stone effect aerosol sprays in a variety of colours. I had a few years ago used one of the these in a dark grey to provide a tarmac like surface to a game board I was building, but like many projects a few years back didn’t see it through to the end. However having recently bought a Bastion Stronghold (Z2014) from Amera Plastic Mouldings for use as a ‘wasteland’ fortification for post-apocalypse gaming (and potentially a bit of Kill Team / 40k on the side) I had an idea…..


Amera have been on my radar for a while. They produce a range of vac formed plastic terrain and scenery aimed at both the wargames and scale modelling (dioramas) markets. Their products are good value and in many cases substantial in terms of size. One of the downsides of using vac-formed plastic however is that the surface details of larger pieces tend to be very flat and lack texture. If only there was a quick and easy way to apply a textured finish, maybe to emulate concrete or pebble dash to my recently acquired ‘post-apocalypse’ stronghold?
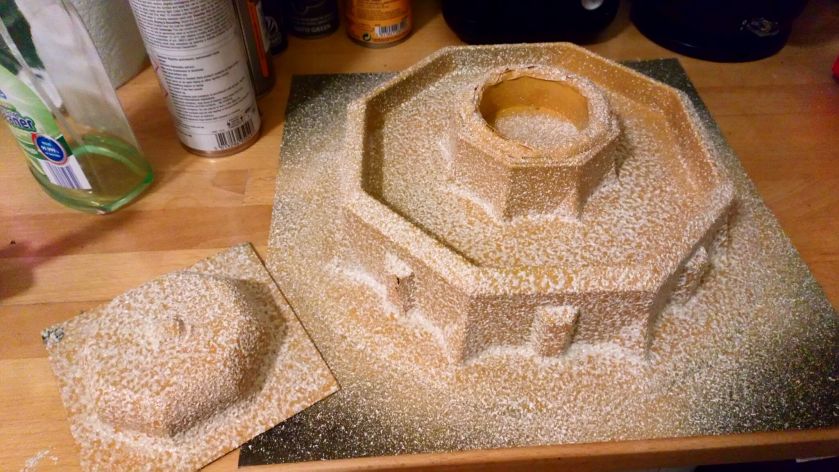
So having put two and two together I started work. After the recommended wash in warm soapy water I gave the whole piece a black undercoat. After leaving this to dry I applied the first coat of stone effect. I had chosen ‘bleached stone’ as my preferred colour of sprays as I though it would match an arid PA wasteland type setting.


First thing to note on the stone effects aerosol is that it is under quite high pressure and comes out very forcefully. It became quite apparent early on that this meant I was going to have to be very patient, do a number of thin coats and wait for each to dry properly. Repeated application of layers on a surface that was not yet dry just ended up moving the stone effect paint already laid down around.


What also became clear was that the black undercoat was not working. The light ‘desert yellow’ / ‘skeleton bone’ like colour of the spray was being overpowered by the dark base. To rectify this, once the first thin layer was applied and was dry (after about 15 minutes) I gave the whole model a full all over spray of Citadel Averland Sunset (a darkish yellow). Building subsequent layers over this was much more effective.


Once I’d completed about 4 or 5 coats using the stone effect I had a good covering and a good scale approximation of either pebble dashed concrete or sandstone.
Where to take it from here? I knew I definitely wanted to weather this down, especially as it was intended to be a wastelands style outpost, but simply dry brushing a highlight over the stone effect would perhaps make it too light. I could of course have left it there, the effect was good enough for ‘basic tabletop standard’, but I was keen to take it further.
I also wanted to ensure that the stone effect paint was protected, so rolled the weathering and protection into one by painting on Army Painter Quickshade Strong Tone. I’m a big fan of Quickshade; not the dipping method, rather painting in the same way as a shade or wash. Normally with miniatures following an initial drying period the shade ‘pulls back’ into the recesses of the model and you can ‘dab’ up any excess with a brush. With this scenery piece there weren’t really any recesses into which to recede so I had to work hard not to show brush strokes in the finished effect. I achieved this using swirling motions with a cheap large brush.


At this stage, to be honest, I wasn’t very happy, it looked like I had dulled down the stone effect too much and the natural gloss of the Quickshade kind of made things worse (albeit I knew I was going to have to dull this down with a top coat). A quick dry brush back up of Army Painter Skeleton Bone seemed to retrieve the situation, but I was now left with a much darker piece than I was originally intending.
I was on the verge of going back to the drawing board, when I thought about maybe rather than weathering this up as an arid desert stronghold, I could shift my post-apocalyptic mindset more towards a ‘nature reclaiming the landscape’ scenario. To that end I liberally applied some green washes and made use of an old bottle of Modelmates mould effect I had.

With the addition of some flock, tufts and overgrowth I was much happier with the final result. The metal supports and door were painted silver and then (probably overly) weathered up using again a Modelmates rust effect. Finally the whole thing was sealed with a couple of thin coats of Testors Dullcote.


All in all I’m pretty pleased with the outcome. I’d highly recommend Amera Plastic Mouldings as a cost effective and striking alternative to other options for tabletop scenery. Using the textured spray paint added that extra level of detail, but required some patience. As they say, you learn from your mistakes.
This finished piece will hopefully be finding it’s way into a game of 7TV Apocalypse soon.

