Reichbusters – Projekt X and other gribblies

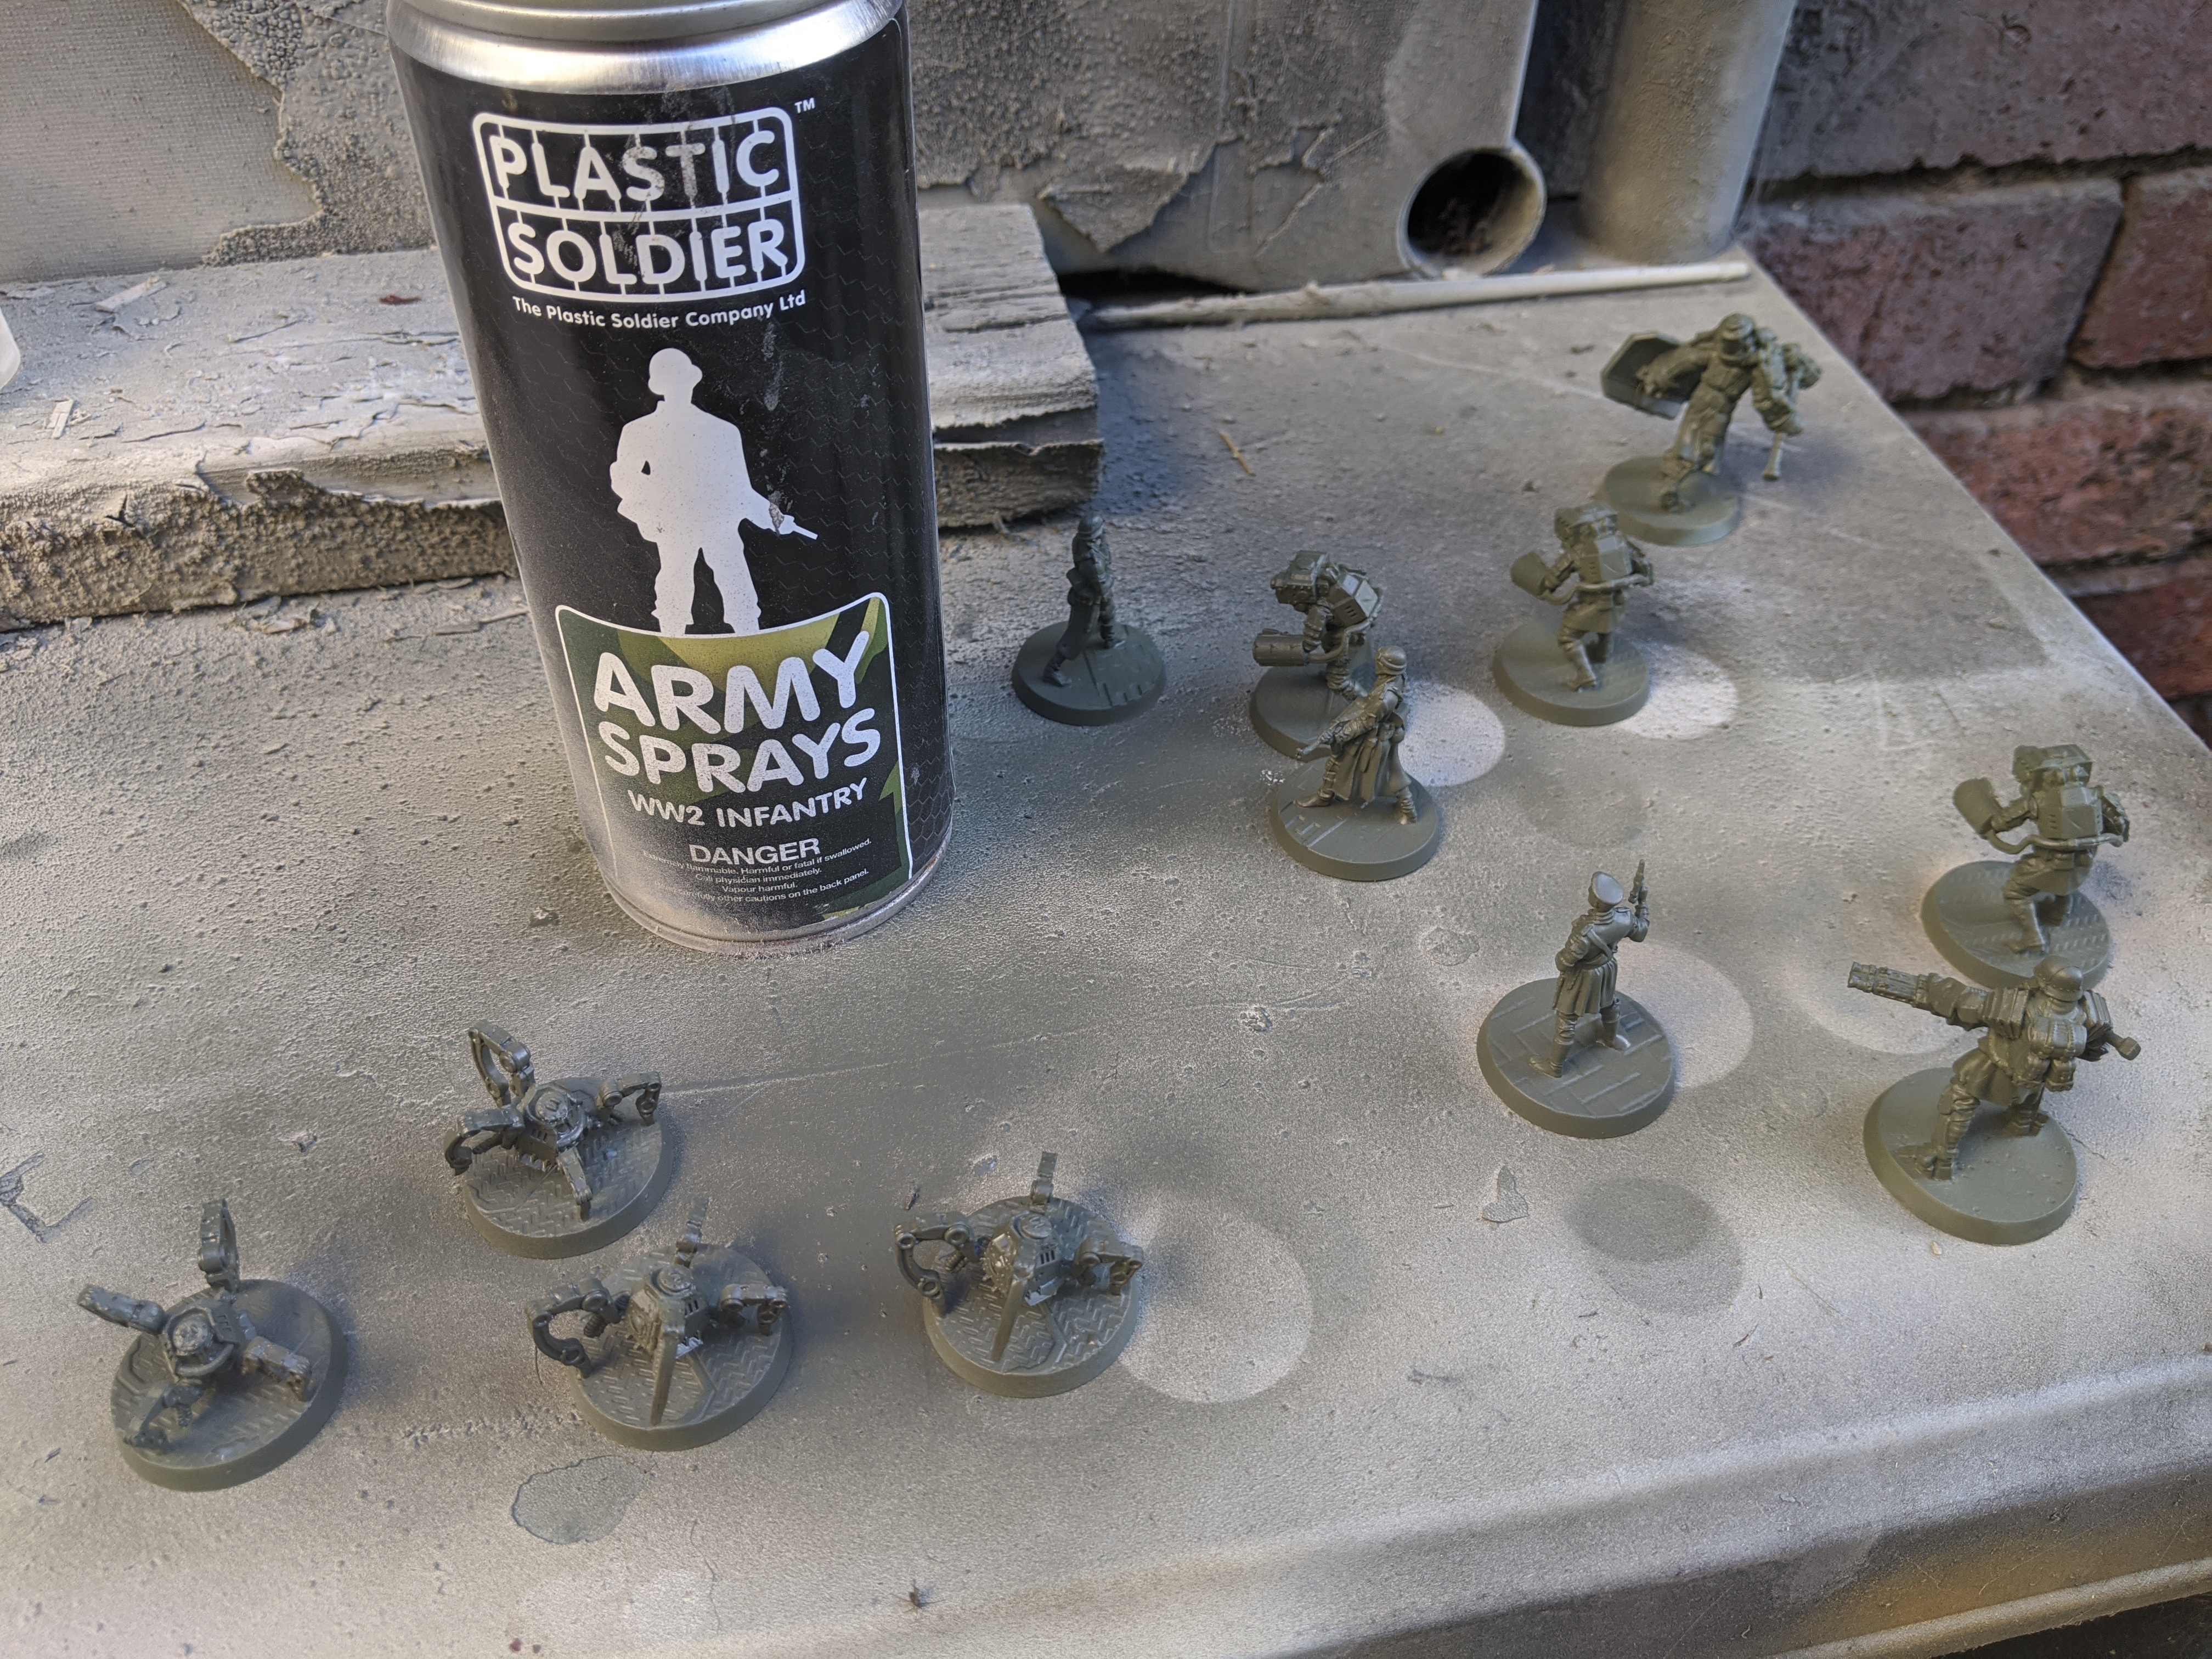
I’m continuing to plough through the pile of unpainted miniatures that came with the Reichbusters Project Vril Kickstarter earlier this year.

Lots to be cracking on with!

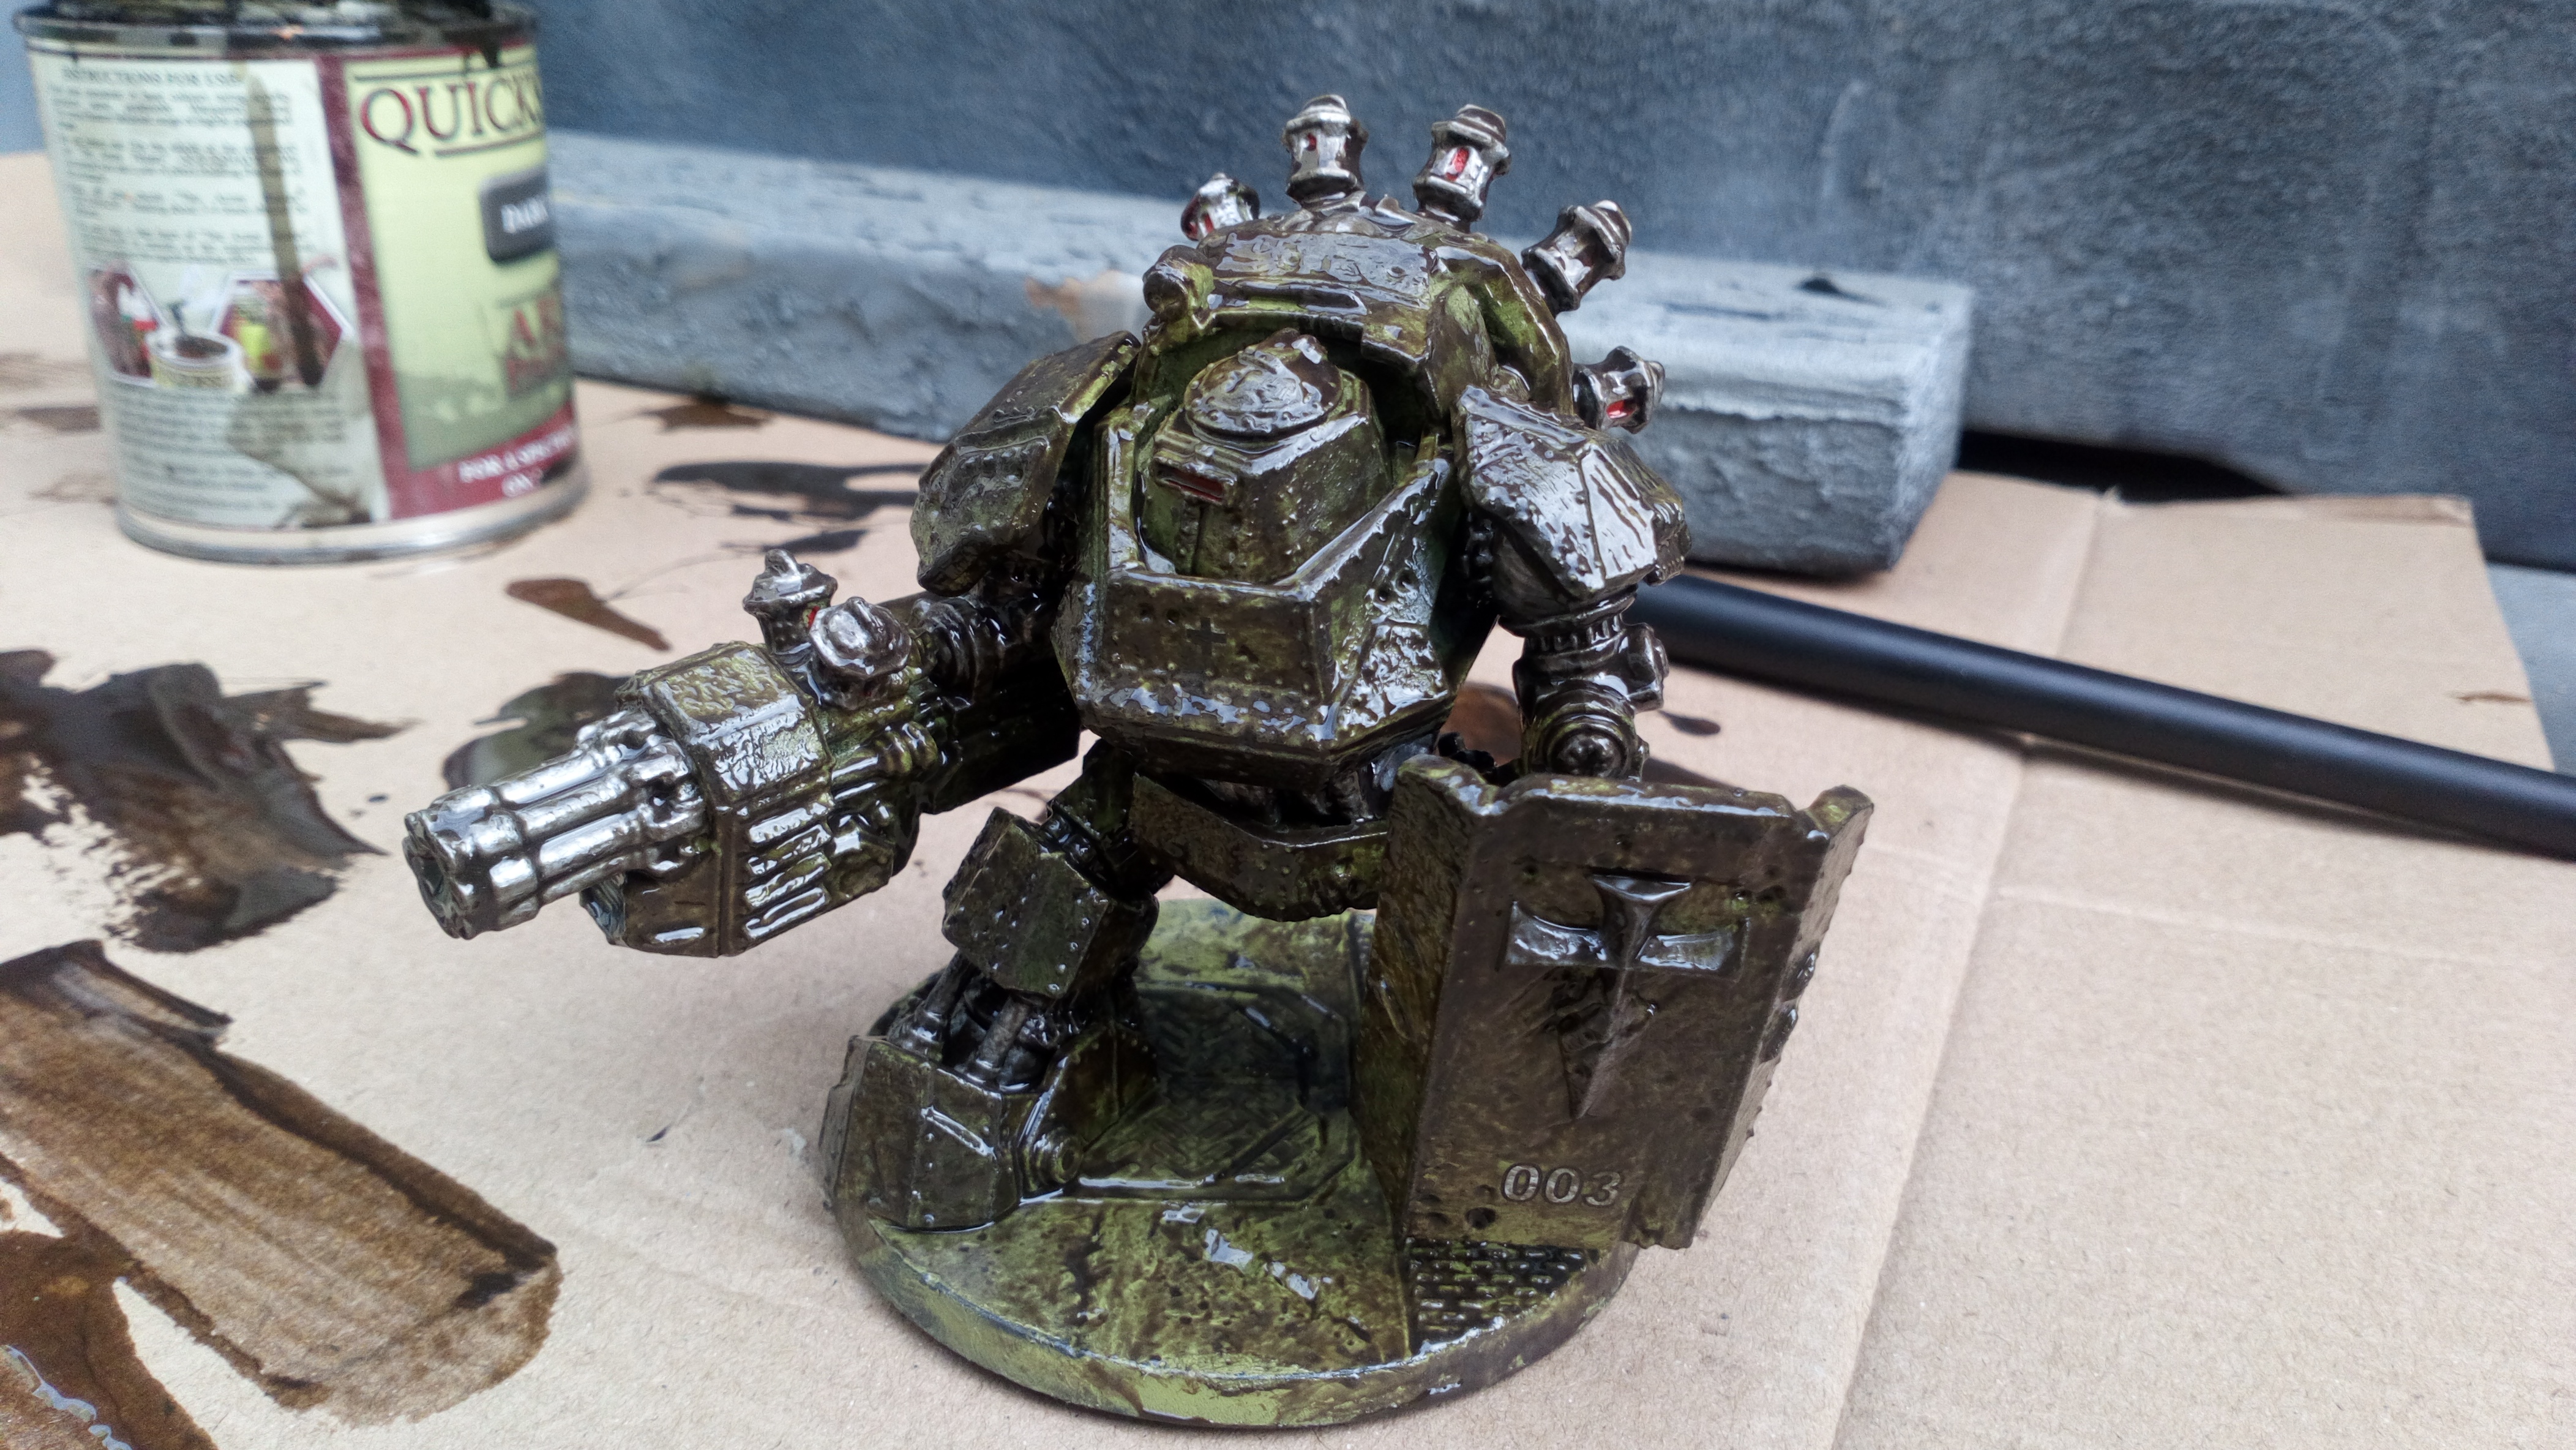
One of my longest ongoing jobs has been the completion of the epic Projekt X. This massive chunk of plastic comes in it’s own boxed expansion and is some sort of horrific zombie mecha type beast. I’ve not read the background yet, so I am not quite sure on the exact details, but needless to say this bad boy would involve a mix of both armour and organic style painting. (Also it is possibly one of the heaviest miniatures I have ever held.)

The beast in it’s box, standard 28mm scale mini for scale comparison

Following a good soapy wash and drying the model was undercoated in black and then given a zenith highlight with a white spray. The armour panels were airbrushed up from a dark grey through two subsequent successive highlights using Vallejo Air paints.

Work in progress showing zenith highlighting and initial armour plate airbrush of grey

The organic parts were painted with a Citadel contrast flesh. The ‘pustules’ all over the model were then painted white before an application of a contrast yellow and then a purple wash.

Prior to weathering I dug into my decals stash and found some suitable World War 2 German transfers from both some historical kits, but also a big pile of Dust Tactics sheets I had left over from stock when I ran the shop.

Application of decals (shown prior to weathering)

These were applied on top of a gloss varnish and once dry I used a sponge to apply chipping across the armour plates using a dark brown. Metal parts were then blocked out and I used dark grey contrast to shade these.

The faces were further highlighted in purples and fleshes to help them stand out, with various other bits such as cabling and the base being detailed and finished off. The whole lot was then topped off with a good once over of Testors Dullcote.

The completed Projekt X

More recently I have also been working my way through some of the ‘minions’ in the set as well as some of the more ‘gribbly creatures’ that are included. For the latter I wanted a quick paint job so contrast was heavily used.

Baddies of various flavours.

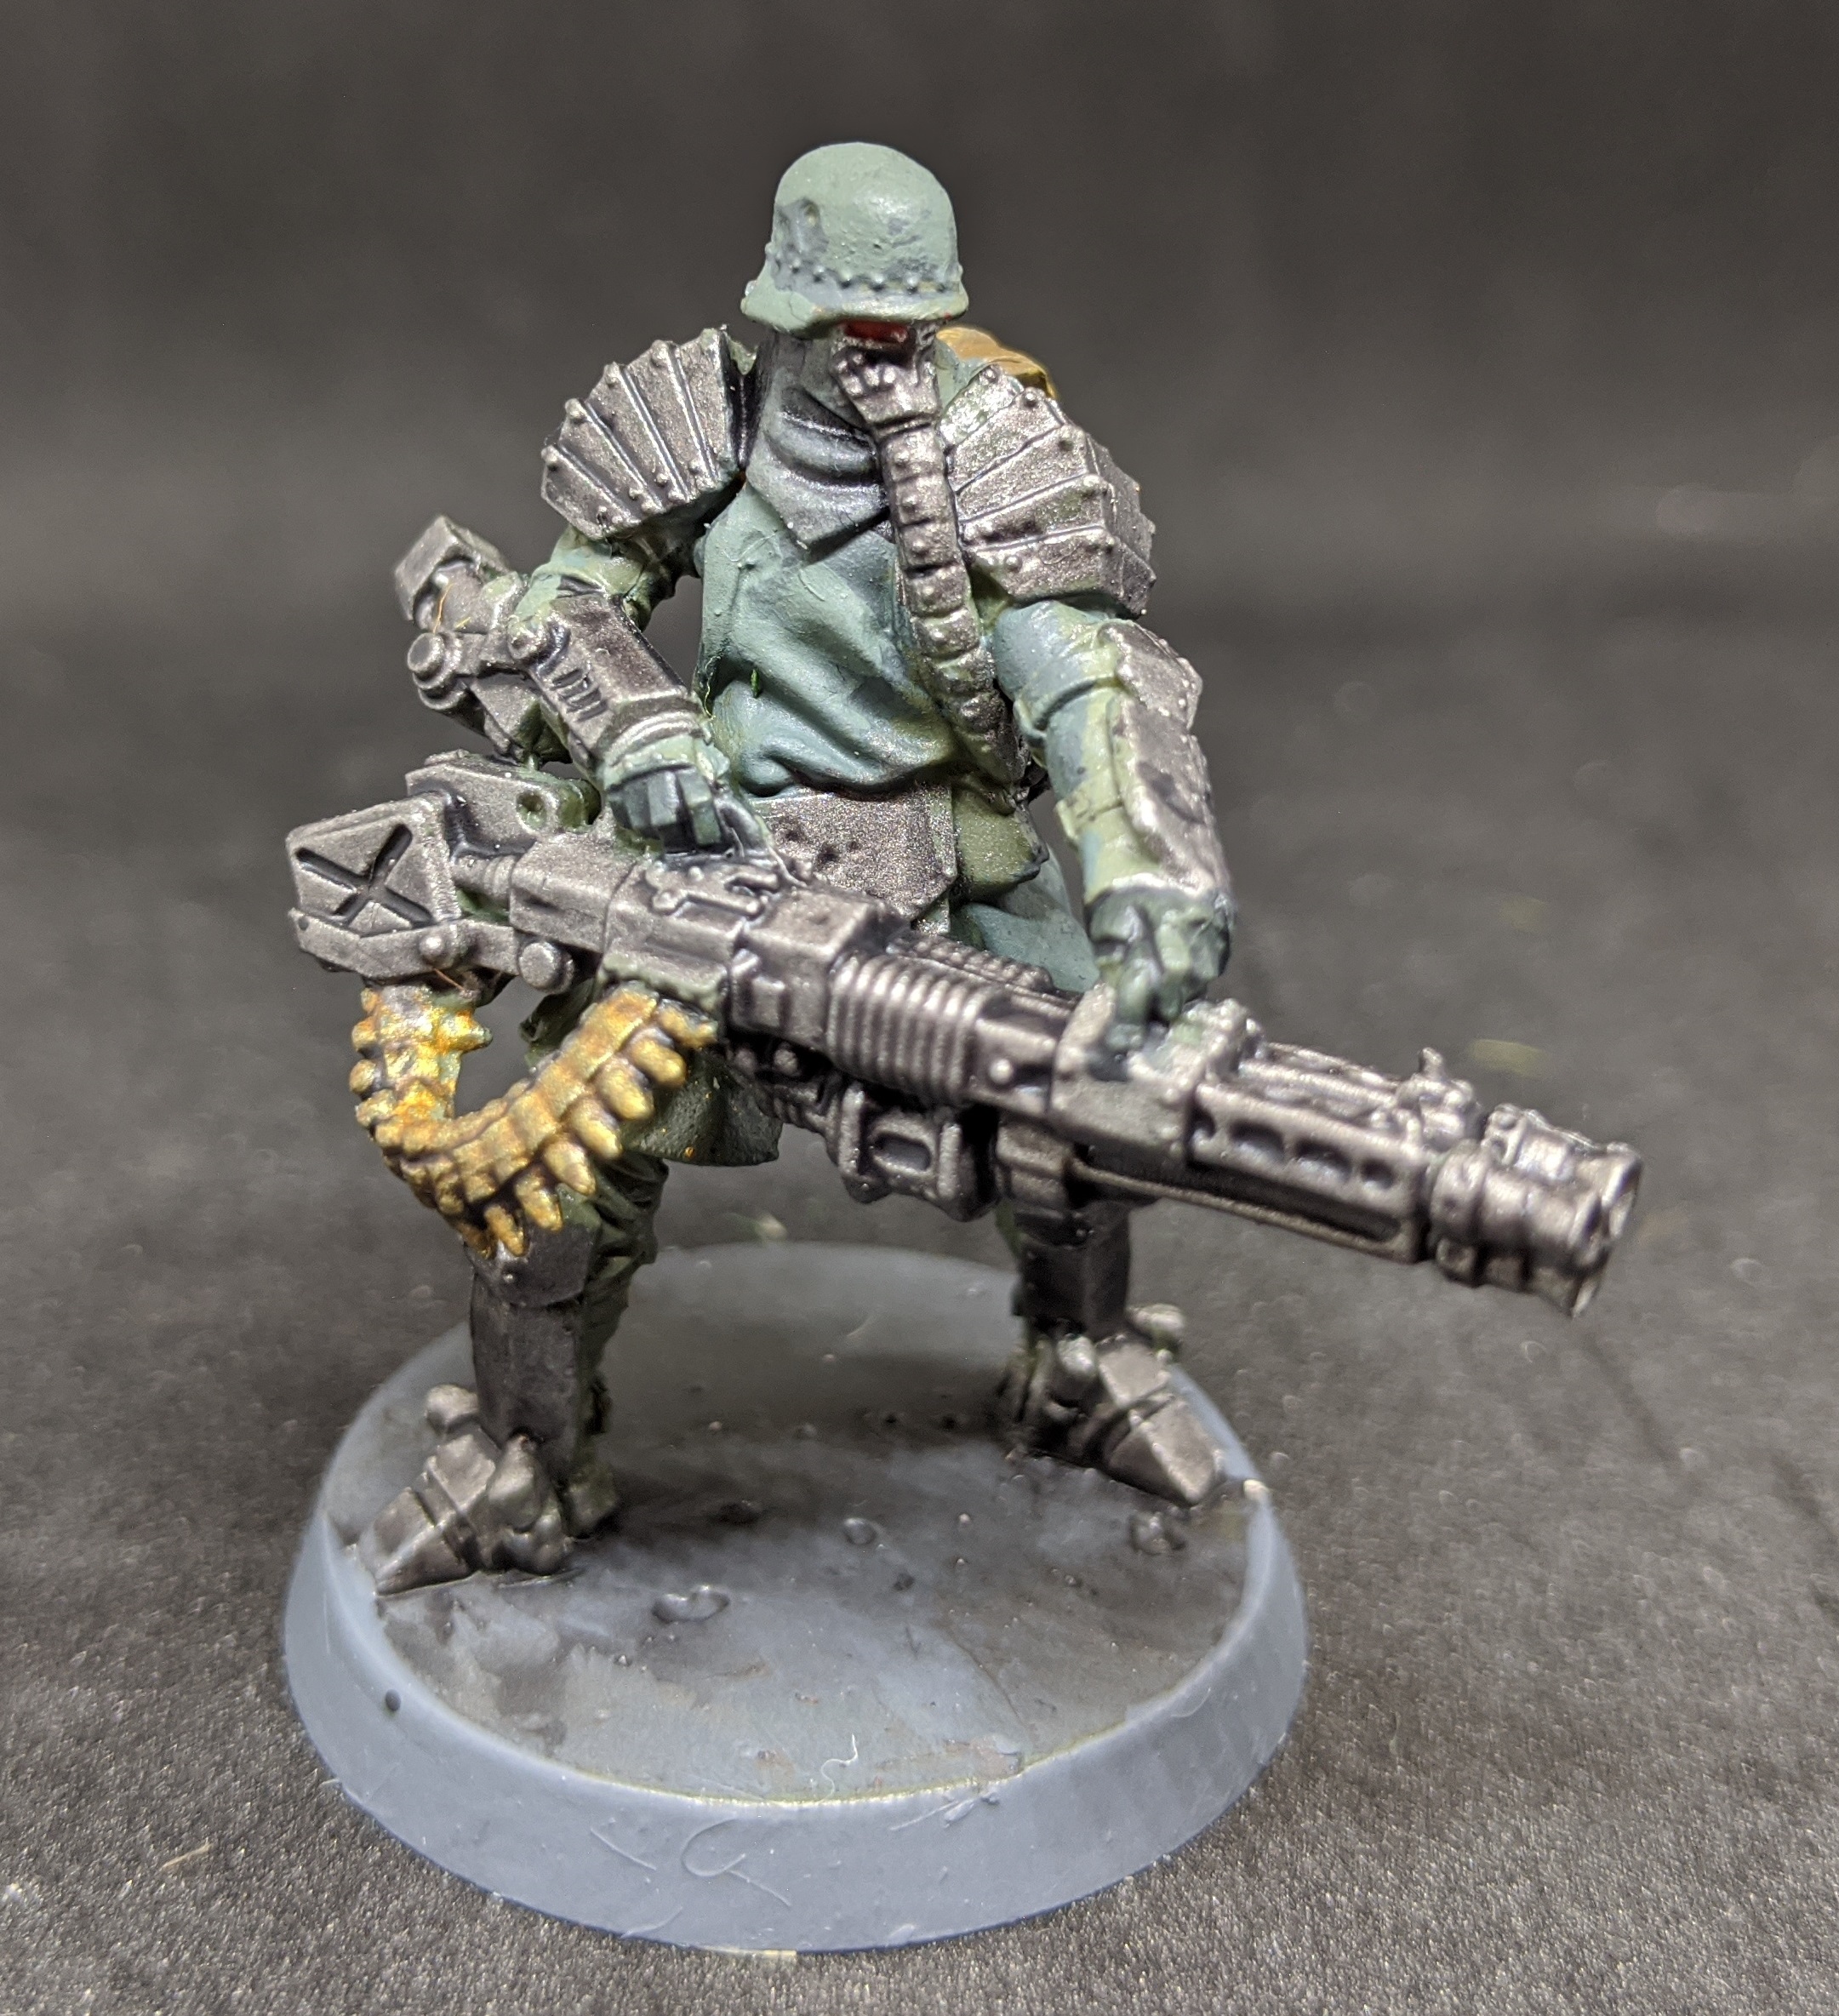
The slightly more human figures were painted in a slightly more traditional style using one of the best paint sets I have ever invested in – a German uniform set from Andrea Color I bought from a show about 5 years ago. Makes painting field grey a joy and useful across historicals as well as weird war and science fiction. (In fact I have recently been working on some Star Wars Imperial types and this set has come in very useful – more on that soon.)

I’ve still got plenty to finish off with Reichbusters and have not yet had a look at any of the hero models. For board game miniatures they are a real step up in terms of quality and a joy to paint, which I am sure I will still be doing for many months to come.

Reichbusters troops, transport and E-100

Quite some time ago I 3D printed a couple of vehicles that I was intending for use in the games of 7TV I ran at Hammerhead.

These were rescaled from the original files that were downloaded from Thingiverse. Designed to be printed at 1/100 (15mm) scale I blew these up to 1/48. I wanted a couple of pieces of ‘terrain’ to add to my UFO/V2 rocket base board and so went for something suitably ‘Weird War’. So here we have an E-100 (one of the so called ‘paper panzers’) and a slightly more realistic (in that it actually existed) Opel Maultier.

In the end these were both surplus to requirements for the game (I’d got more than enough terrain in the end and hadn’t realised just how big the E-100 would end up being).

I got some nice smooth prints from my Creality CR-10S which made preparation and painting a joy. Both models were basecoated in Dunkelgelb spray (from Plastic Solder Company) over a black undercoat.

The airbrush was used to add the dark green camo patches and weathering was achieved using a sponging technique. Decals were appropriated from my stash (they were applied following the base coat / camo, but prior to the weathering).

Opel Maultier in 1/48 scale

I’ve also recently been making a dent on the big pile of plastic miniatures I need to paint for Reichbusters. At about 35mm (maybe even 40mm) scale these also fit in very well with the 1/48 vehicle prints.

As an aside I am a big fan of using 1/48 vehicles for my standard wargaming with 28mm figures. I find the usual 1/56 vehicles (such as the Bolt Action and Rubicon ranges) while albeit nice models, just a little small in comparison to based 28mm miniatures. The bonus here is that I could use these vehicles with slightly larger figures, such as the Reichbusters ones, without having to worry too much.

Having done a couple of test pieces I chose a squad of ‘standard’ German troopers from the game to tackle first. These are lovely one piece miniatures, the sculpting and ‘hardness’ is good for boardgame pieces so I can see them being used extensively outside the actual game for more wide ranging tabletop adventures.

The test model – I subsequently switched from a black to a white undercoat

One of the disadvantages of course with board game minis (especially when considering troop types) is a lack of variety in poses. To work around this a bit for this squad I varied the colour scheme slightly. While keeping the basic field grey fatigues (for which I used an excellent multi-shade set from Andrea Colour) I varied things like the trenchcoats and boots by using different colours. This was mostly achieved using Citadel contrast paints (black, grey and various browns).

I kept the bases simple this time, dropping the rust effect
Maultier with troops

Unlike the test models which I had undercoated black I worked up from a white undercoat here (as I knew I wanted to use contrast to save some time).

Three of the troops showing slight variations in paint scheme

Although these chaps did get a bit repetitive I really enjoyed painting them and as such I’ve picked a variety of different models from the game to paint up next. As the weather has been so good recently I have been doing a lot of undercoating outside and some of this lot have been done using my new favourite tool, Citadel Colour Wraith Bone spray.

Reich Busters Vril Panzer

I recently got a rather large box in the post all the way from France.  Inside, my Reichbusters Kickstarter pledge rewards.  I am a bit of a sucker for Weird War settings and games and from what I saw when the campaign was running, the game looked right up my street too.

However it was really the miniatures I was after.  I fully intend to play the game, but like many things in my collection the thought ‘I could always use this for 7TV‘ is never far from my mind.

Now, there are a LOT of figures here.  The scale is somewhat larger than standard 28mm and probably sits somewhere between 35 and 40mm.  Fine on there own in any game, but might look a little odd alongside other parts of my collection.  Where this isn’t really a problem is with the ones that immediately caught my attention when opening the boxes for the first time.  The ‘Vrill Panzers’ – basically big stompy (piloted) robots.

2020-04-10 10.51.43
Vrill Panzer top right (more on the big chap in a bit…..)

There are two of these in the set of boxes I received, they are (like all the miniatures) one piece casts in a very hard PVC style material.  Absolutely no sign of warping or bending weapon syndrome from what I have seen so far.  The Vrill Panzers are chunky, really nicely detailed and heavy; however they are by no means the biggest models in the set (more on that later).

So in terms of getting the Vrill Panzers painted up I thought I would go for a ‘late war’ dunkelgelb, by really weather it up.  With there being two in the set I could afford to experiment a bit on this first one.

First step was a wash in warm soapy water.  This is something I never used to do on any models, but now religiously do whether I am painting PVC, hard plastic, resin or metal.

Once dry I undercoated with a can of black primer and followed this with a base coat of dunkelgelb (from Plastic Soldier Company – again in a can).

2020-04-14 13.02.05

Once dry I applied decals.  There were none provided with the game, but I have a huge stash of World War II and Dust Tactics decal sheets that I have amassed over time, so I had plenty of choice.  My usual approach, which I used here, is to paint the area I am going to apply the waterslide decal to with gloss varnish first.  Once dry I applied the decal itself and again let it dry before another coat of gloss.  I placed a few markings strategically then moved on to the weathering.

The first stage was to stipple using an old bit of sponge both dark brown and then silver across the most worn areas of the model.  Next it was time to dirty it all up. My plan here was to paint on Army Painter Quickshade Dark Tone.  I have had some success in the past with a fairly light coat of this brushed on to models.  It leaves them very shiny, but protected and I always apply matt varnish as the final step in these cases.

2020-04-16 23.09.42
Ready for Quickshade

2020-04-17 17.18.06
It’s all about to go wrong

The problem I hit here was my can of Quickshade was quite old and hadn’t been sealed properly the last time I used it.  As such I had to remove a thick skin from the surface of the shade within the tin before application to the model.  This is where the alarm bells should have run, however I proceeded to ‘slap in on’.  It was at this stage I noticed how thick and gloopy it was.  I stirred it up as usual but once applied it became obvius that something was wrong.  Rather than apply the subtle shading I was after, and rather than immediately receeding into the contours and crevises of the model it just sat there like some vile dark slime.

2020-04-17 17.35.21
Bit much?

Through excessive mopping up with a brush I was able to dave things to some degree, but the weathering has ended up being much, much heavier than I intended.  Once the matt varnish (Testors Dullcote) was applied things looked a lot better, although I had made some of the decals rather difficult to make out.

The final weathering stage was to add some rust (it seemed apt with how heavy beat up the mech now looked).  I drybrushed on some Citadel Dry Ryza Rust and in the end I think this turned out OK.

The base was in part basecoated in silver and then painted over with Citadel Basilicanum Grey (a contrast paint, this is my new favourite way of painting a gun metal effect).  All the bases in the game have a metal gantry / walkway look to them, so this fitted quite well especially when finished up with some more drybrushed rust.  The areas that looked more stone like were done in greys.

2020-04-29 13.34.39
The finished article

All in all I think I managed to rescue it.  Apart from the Quickshade incident it was an enjoyable model to paint.  As I have another one in reserve I might go with a different, cleaner, more fresh of the production line look.

In addition to the Vrill Panzer I also painted a couple of the ‘troop’ models from the game to test out some colours and techniques.

I’ve also started on the monstrous Projekt X mech.  Remember when I said the Vrill Panzers weren’t the biggest model, well this fella is truly gigantic (and actually quite difficult to lift).  He is still work in progress and I’ll cover this in another article.