Scratch Built Oil Rig – Part 2 – Refinery and Crane

I’ve managed to get a bit more work on the 28mm scale scratch built Oil Rig.  Having finished off the bulk of the superstructure I’ve now moved on to looking at the main body of the rig.

As previously discussed I have approached this in a module manner.  Each of the 2 foot square tiles now has a removable leg support and ‘concrete boot’, the idea being that the four of them can be arranged in any combination to vary the gaming service as required.  Each of these component parts of the platform will be themed to a specific ‘function’ of the oil rig and in summary these will be bridge/ops centre/crew quarters, helicopter landing pad, loading crane/storage area and refinery.

It’s the latter two that I have been initially concentrating on.

Refinery

For the refinery I have used a modular plastic model kit of a ‘Chemical Plant’.  Manufactured by Tehnolog in Russia, but sold under licence around the world (in the US by Pegasus Hobbies and the UK by Pocketbond) this kit is out of production but you can still find the odd boxed and version on eBay.

chemical_plant_box

I picked up a complete set a few months ago with the original intention of this being used for a post apocalypse tabletop for 7TV.  In the end this fits the bill for ‘the business end’ of the oil rig quite nicely.  Fully hard plastic and stuffed full of components, this is really like a lego kit for wargames scenery builders.  It does have some instructions and suggestions on how to build, but I really just free formed it with all the pipes, valves and tanks available.  This did end up being a bit fiddly, but was a gentle distraction for a couple of hours.  In addition to the core bits and pieces from the kit I added in some extra touches from my bits box, including some 40k scenery bits (in red plastic in the photos) and some platform pieces from the Robogear Starter Set (also produced by Tehnolog).

Rather than build this directly onto the platform I found a separate base for this (an old Warhammer movement tray), with addition of some magnets I’ll be able to use this as part of the rig table or just as a standalone piece elsewhere (meaning it may see the apocalypse after all).

2019-05-10 22.41.38
Refinery sat on modular platform (Zulu for scale!)

For the time being I have kept painting simple, a black undercoat and all over gun metal drybrush.  Various ‘tanks’ have been picked out in red, with ‘valves’ painted gold.  At some point moving forward I will look to weather this up suitably.


Crane and loading area

For this part of the board I wanted a big structure and rather than try and build something completely from scratch I’ve gone down the MDF kit route.  TTCombat do some really good value kits and I’ve gone with their ‘dockside crane’.  Again I’m approaching this from a modular view point with the idea being this can be removed from the rig and used as a separate piece on a different board as required.

The build on this was fairly straightforward, with minimal fuss, although the tolerances were very tight and I have had to do some creative trimming to make all the parts fit.  This was more down to my lack of care and precision rather than any inherent issue with the kit.


I painted this in quite a basic manner blocking out colours roughly and allowing the subsequent weathering to do a lot of the work for me (masking mistakes and dulling down some of the primary colours). Warning stripes were added using an MDF stencil, again from TTCombat.  The stenciled lettering and logos on were ‘painted’ using Gundam paint marker pens.

I wanted to give the crane a look that, although operational, it was no longer cared for or maintained properly.  This involved extensive use of rust effects, including dry brushing of Citadel Ryza Rust, a liberal application of some Modelmates Rust Effects and the use of weathering sprays from Plastic Soldier Company.  The whole model was then sealed using a liberal all over spray of Testors Dullcote.
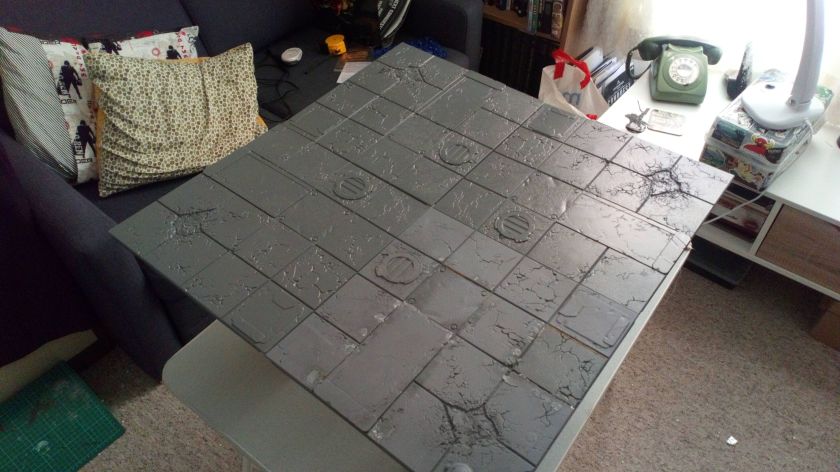
Platform tiles

I’ve also started to add some colour to the platform tiles themselves.  Again I am keeping this quite basic for the time being.  A base coat of silver was applied using a cheap (and very smelly) can of paint sourced from Poundland and an brush on of Army Painter Quickshade Dark Tone was then applied.  This was again dulled and sealed using Dullcote.  There is some further tidy up and weathering to do here, but that is for another time.

2019-05-13 19.30.37

It’s all starting to come together and although time is rapidly running out,  I’m still on track to debut this at the 7TV campaign day at Dales Wargames on May 26th.


Scratch Built Oil Rig – Part 1 – superstructure

I’ve always been kind of fascinated by North Sea Oil Rigs.  There is something brutal, impossible and imposing about these behemoths.  They just kind of look impossible (and a bit frightening).

oil rig ref
© Brian Jobson / Alamy

From a gaming perspective I’ve never really been into sea based or naval wargaming, but having an oil rig/platform to play on brings to mind such inspiration as Bond (Diamonds are Forever) and the classic (in my eyes) North Sea Hijack!  Of course the ideal game for such a setting is my go to favourite, 7TV.

North Sea Hijack
In which Roger hates women but loves cats

So a few months ago I made up my mind that I was going to build an oil rig as a gaming table.  The objective of this project would be to produce something that looked kind of realistic, was easy to game on and was modular and therefore easy to transport.  I also felt that I wanted to have a go at scratch building much of this from household bits and pieces wherever possible.  So just after Christmas I put the call out to friends and colleagues for any spare coffee and sweet tins.  Because of the season I managed to get a huge variety of Roses, Miniatures Heroes, Celebrations and Roses tins in various shapes and sizes.  At the time I wasn’t quite sure of my design but felt these would provide a good basis for legs or supports.

Rig 27
The design takes shape

Likewise for coffee tins, but I found these a bit harder to come by.  I will admit at this point that I resorted to eBay and actually bought a job lot of empty Illy coffee tins (who know there was such a market for such a thing online?).  Once these arrived my design began to take shape and these seemed like an obvious choice for my legs.

The actual playing surface itself was a bit of a cheat (and not at all based on recycling household items).  Many years ago when running the shop I had stocked some modular plastic gaming tiles from Secret Weapon Miniatures.  I still have four of these that were originally designed for Mantic’s Deadzone.  As these were 1 foot square they would allow me to build the rig in four parts, each supported by a coffee tin leg with a chocolate tin as the concrete ‘boot’ or foundations.

Extending the modular idea, each quarter tile would be built in such a way that they could be put together in any order.  I decided that each tile would also have a different purpose and I divided them as follows:

  • crew quarters / offices / command deck (I’m not entirely sure if on an Oil Rig you refer to a ‘bridge’
  • refinery (an industrial looking bit)
  • crane / cargo area
  • helicopter landing pad

I’d also aim to have some form of removable central structure that would be higher than the other parts of the rig and maybe culminate in some form of radar mast or communications array.

I’m going to cover the individual area builds in some future blog entries, but for the time being, with the weather being good and some free time on my hands this weekend I’ve cracked on with the super-structure!

First off, the coffee tins proved to be really spot on for the purpose I had in mind.  Each was the same size and came with a screw on lid.  By affixing one lid to the bottom of each platform tile I have been able to easily implement a system for taking the rig apart for transport and storage.  I decided on a ‘two tin’ height for each leg.  By gluing the top of one tin to the bottom of another I could further disassemble each leg into two parts, again meeting the modular objective.

rig 36
Lid affixed with super glue to the bottom of each platform section
rig 30
Next lid glued to the base of the ‘previous’ tin


Rig 5
All four sections – showing assembly method
Rig 3
And the right way up

Four matching plastic chocolate ‘tins’ (Cadbury’s Miniature Heroes for those of you who are interested) were chosen as the ‘concrete’ foundations for each leg.  These were inverted so the lid was at the bottom and a coffee tin sized hole was cut in each for the main leg to slot into and provide stability.  I decided not to glue the lids of chocolate tins together as they had a good seal and I want the ability to add ballast to these if necessary in future.

The tiles themselves come with a system of clips which link them together, so these would provide some extra stability and stop the sections moving independently.

Rig 2
Top view

Paint was applied to ‘legs’ and ‘boot’s next.  Black car primer for the undercoat followed by a cheap Nato green spray for the legs and my old favourite textured stone paint for the ‘boots’.


Rig 17
Paint Factory Nato Green (Matt) was only £2 a can (from Boyes)

I’ve covered the use of textured stone paint in a previous blog entry, but needless to say the same principles applied – lots of coats and considerable drying time between each.  I started off using a mid-tone stone, but soon ran out so ended up with subsequent coats of a lighter ‘bleached stone’.  Once this is weathered down I don’t think it will look too bad, and certainly from the off it gives a great representation of concrete.

Once I’d taken advantage of the decent weather to dry these components outdoors, it was time for a test build.

Et voila, so far, so good.

Rig 26

Rig 25

Size wise on it’s own this gives a 2′ by 2′ playing surface which is ideal for a small skirmish game, but plonk this on a bigger layout (maybe on a blue ‘sea’ cloth) with a few strategically placed boats and you could have for some quite interesting scenarios.

Rig 24

Rig 23

Next up will be to work on some the individual tiles.  For the refinery I will be using a Pegasus/Conflix/Tehnolog ‘Chemical Plant’ kit with some Games Workshop and Mantic additions.  The crane and containers will be an MDF kit, as will the living quarters, while for the helicopter pad I will be sticking with the coffee tin / confectionery container approach.

Quite a bit still to do, but I am aiming to get this ready for the 7TV campaign day at Dales Wargames Club in May.

Further updates soon…