Empire of Men – To catch a Stahlratte!

I recently blogged about building the epic Stahlratte, a sci-fi style heavy tank in the style of the legendary Maus produced by Archon Studio as part of their Empire of Men Kickstarter.

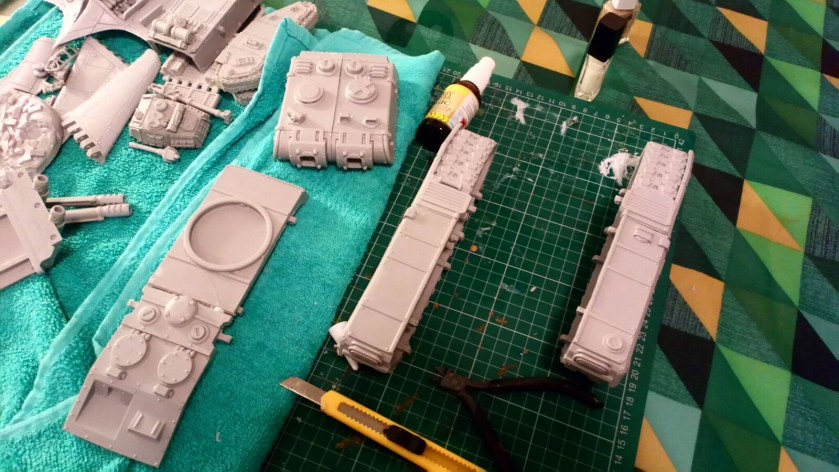
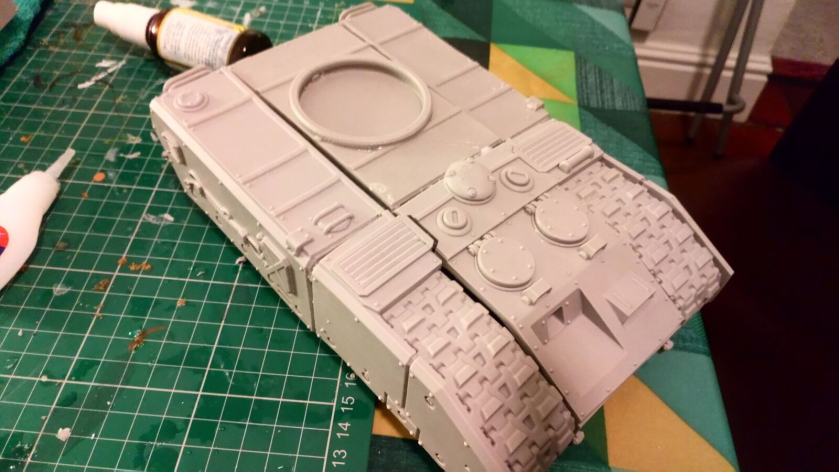
I’d got to the point of having assembled the resin beast and through copies use of greenstuff and a bit of boiling water got the build to the point at which I was ready to get some paint down.

First off, I’d made a decision to go ‘German Weird World War’ rather than ‘Grimdark Future’ in terms of theme. However rather than go with the classic late war yellow / camo look of the immediate post war timelines of things like Dust and Konflikt 47, I decided to go with a more science fiction / modern camo look. Originally I was planning on using some splinter style camo templates from Anarchy Models, but upon inspection these looked a bit too small. In the end I decided on a light grey/dark grey angular camo pattern using masking tape to mark the pattern out. Using a Panzer Grey spray from Plastic Soldier Company over a white undercoat, the masking was applied and a light grey then applied (Humbrol).

Once dry I tackled the tracks, using a Reaper Miniatures Charred Brown mixed with a few drops of Valejo Glaze Medium to help thin.  This was then followed with a silver drybrush using Army Painter Plate Mail.

I decided to tackle decals next (prior to weathering). Decals were sourced from my decals spares box. Most of these were Dust Tactics Axis decals.

Weathering was achieved by applying an all over brush on of Army Painter Quickshade Dark. Once dry chipping was applied using a bit of old sponge, first using a dark brown and then a silver, concentrating on the edges and areas that would be subject to the most wear. Finally (and as an experiment) I applied a bit of Modelmates engine oil around some of the grills and as vertical streaks on the side panels.  Final steps were to dull down the Quickshade using an all over spray of Testors Dullcote.

All in all I pretty pleased with the outcome. I haven’t really got a game lined up for this, but I imagine this might be appearing in a ‘moon Nazis’ scenario in 7TV as a centrepiece or objective.

I’ve still got a couple more vehicles to finish off from the Kickstarter and the troops I’ve got are ear marked for Imperial Guard proxies for Kill Team (not a game I have tried yet, but something my gaming group is starting to get into).

Empire of Men – Building the Stahlratte!

I recently received my pledge rewards from the Empire of Men Kickstarter campaign by Archon Studio.  The campaign was to fund production of a range of resin miniatures and vehicles, that although rules agnostic were clearly aimed at players of ‘grim dark’ games of the far future.

I was particularly attracted to this for the Weird World War look of some of the figures and vehicles.  The background fluff for the setting is based around a Great War that never ended, and many of the vehicles on offer have a distinctly German feel to them.

Without a particular game system in mind and due to limited funds I went for a small selection of troops and a few vehicles; figuring that I would enjoy the modelling and also falling back on my usual approach of ‘it’ll probably work for 7TV‘ (a ‘Moon Reich’ perhaps?)

So what did I get?  In addition to a handful of ‘stormtrooper’ troops I picked up the follow:

  • Reaper – a Horton style flying wing aircraft
  • Stalhratte Mk.1 – a super heavy tank that seems to draw it’s influences from the prototype World War II German Maus
  • Wolverine – a transport / medium tank option (probably the most 40k like of the lot)

First impressions on receiving delivery was that the casts were quite clean (particularly on the figures).  The grey resin is lightweight and looked easy to work with.  It looks and feels more like plastic, is soft (but not too soft) and not at all brittle.

The part count for the vehicles is quite low, meaning in particular for the Stahlratte there are some quite chunky pieces of resin.  Once unboxed and gave the parts a good wash in hot soapy water to remove casting residue and make then easier to assemble.

So, I really couldn’t resist assembling the big fella first.  All the parts seemed to come with peg joints and inserts, so theoretically it should be possible to do a dry fit before assembly.  After an initial clean up primarily around the joints and edges to remove casting vents I attempted to ‘clip’ the Stahlratte together.  It immediately became apparent that some of the parts were warped to some degree, so of course (as always when working with resin) having to boiling water to hand to soften and reshape was a must.  Many of the issues were with the small peg joints so I found imersing these in water to make more malleable and ‘clipping’ together while still soft was the way to go.  At this point I also decided to glue pieces in place as I got a good fit (using superglue and activator).

assemble3
Top and bottom hull – note connector pegs
assemble2
Soaking connector pegs
assemble1
Tracks, turret and hull
assemble4
Turret – two piece assembly
assemble5
Top hull
assemble6
Part assembly

At this point things were beginning to take shape, but it was becoming apparent that a LOT of work would be needed to fill the gaps.

gaps
Gaps prior to filling

A generous application of green stuff and voila an almost completed Stahlratte Mk.1

All that remained was tho straighten up some of the gun barrels and attached to the turret.  I’ve decided to keep the turret and hull seperate for painting, so the pictures show one just delicately balanced on the other for the time being.

All in all I really enjoyed putting this together.  It was more work than I originally expected when opening the box, but I think that is to be expected when working with resin (especially considering the budget price point).  If anything I found the gap filling quite cathartic!

Next time – The Wolverine and Reaper!